


As you may know, one of our main areas of expertise at Agility3 is developing high quality virtual 3D road environments specifically for use within our client’s Driving Simulator facilities. This is a capability that we have been offering for several years and it supports our clients in delivering cutting-edge driving research, connected and autonomous vehicle testing, road layout/design reviews, stakeholder engagement and more.
But how do you actually go about developing a virtual 3D road environment for a Driving Simulator? What’s the process? What’s needed from the client?
These are all questions we will address in this blog to give you some insight and understanding of this area of expertise. If you still have questions after reading this or would like to know more, then do get in touch and we’ll be happy to help.
Generally, the process for creating a virtual 3D road environment for a Driving Simulator follows a series of defined steps…
- Defining the Content Requirements
- Defining the Technical Requirements
- Acquiring the Necessary Date
- Environment Building
- Testing
- Delivery
These steps do not always occur in this order and some take place at the same time. Let’s look into each one in a bit more detail.
1. Defining the Content Requirements
The first step in this process is to understand what you want the virtual 3D road environment to look like and there are many elements to consider here.
1a. Objectives of the Project
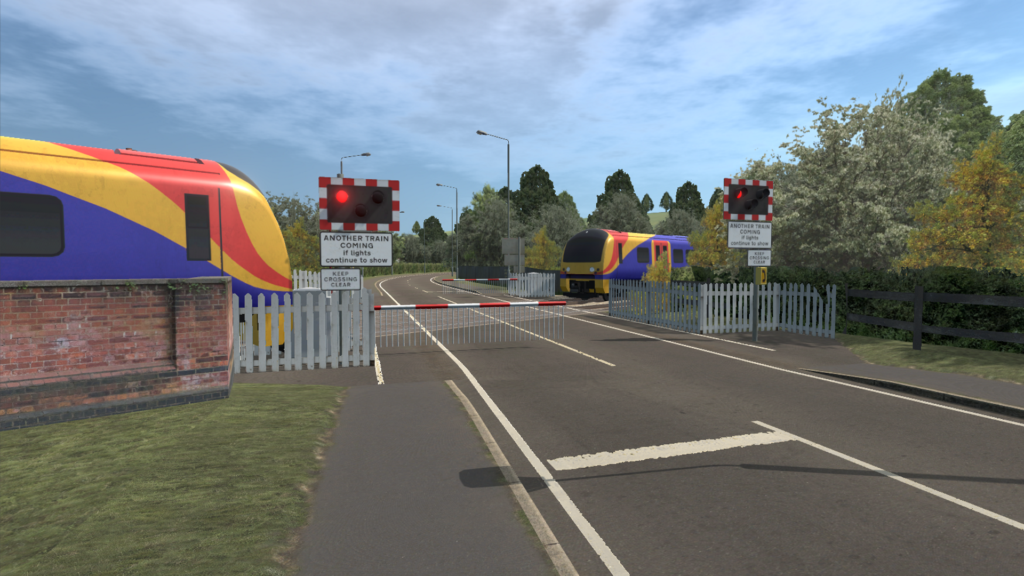
It is imperative at the very start that we understand the objectives of your project. This will help us to appreciate what features of the virtual 3D road environment are important for the project and will determine our requirements. For example, the image below is taken from a virtual 3D road environment we delivered to help our client conduct research into how drivers behave when presented with varying barrier configurations at level-crossings. As this was the focus of the project, we knew that the level crossing area was the most important feature, the visual representation of the crossing and the animation of the barriers needed to accurately reflect the real-world and the environment needed to avoid distractions as the driver approached the crossing. Knowing these things enabled us to prioritise the most important aspects of the environment and deliver precisely what was required.
1b. Geospecific vs. Geotypical
Then we need to establish what the general appearance of the virtual 3D road environment needs to be. A crucial aspect here is whether the environment should be “geospecific” – a representation of real-world roads (either now or how they could be in the future) and their surroundings, or “geotypical” – a fictitious road environment.
When a geospecific road environment is required, we need to understand the real-world geographical area that needs to be represented and which roads the driver will be driving down. Then, following from our understanding of the project objectives we would work with you to agree what features from the road surroundings are required. These can include buildings, signage, traffic lights, streetlights, walls, barriers, fences, bus stops, vegetation, benches, bins and more.
In the case of a geotypical road environment, we will work with you to agree the design of the road network, for example a 4-lane smart motorway, does it require any junctions? Does it need examples of country road or dual carriageway? Do any potential hazards need to be incorporated, for example blind dips in the road, hidden junctions or perhaps a school crossing. Based on our understanding of the broader project requirements we will also work with you to agree what to include in the general surroundings, for example, whether the road is to run through a residential area, urban area, countryside etc. Are any specific features required along the route to support specific scenarios or research objectives?
There is often a balance struck between geospecific and geotypical due to budgets (generally, producing geospecific environments is more expensive) and data availability (to be discussed later). Therefore, where you require a geospecific road environment we will often work with you to agree exceptions where the environment does not have to be exactly like the real-world route. For example, it may be possible to fully achieve the overall project objectives while having only a selection of buildings highly representative of the real-world buildings, perhaps because those ones are easily recognised when driving along the roads. Other buildings that are more generic in appearance, such as office blocks, houses or warehouses, can be less representative of the real-world buildings.
Also, clients requiring a geotypical road environment often ask for the route to be a generic representation of a real area. Therefore, whilst the features along the route do not need to exactly match with a real route, the route still needs to have a feel of a certain real area with similar features and look. This was the case for the environment seen in the image below where the requirement was for a geotypical road environment depicting a generic representation of roads in West London, such as the Hammersmith area.

1c. Desired Level of Quality and Detail
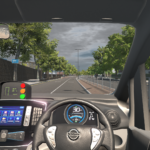
Once the general road environment appearance requirements have been covered there needs to be a discussion around the desired level of visual quality for all the features to be included in the virtual 3D road environment. A higher level of visual quality and detail will improve the overall fidelity of the virtual environment and the level of immersion but does require a higher budget. The level of quality that can be achieved is also influenced by the target simulation software and hardware. For example, those simulators making using of games engines such as Unity or Unreal, will generally be able to achieve higher levels of visual quality, compared to simulators that use more traditional image generation technologies such as OpenSceneGraph or OpenFlight. The image below shows an example of the difference between lower (top image) and higher (bottom image) levels of visual quality and detail.

1d. Geographical Accuracy
The next consideration on the list for content requirements is only applicable when a geospecific virtual 3D road environment is needed and that is how geographically accurate the environment needs to be. The level of accuracy we are referring to in this instance is usually with respect to the location and dimensions of the roads, road markings, kerbs and potentially other features and how accurately they are placed within the virtual road environment in comparison to the real-world environment. The level of accuracy needed is often dependant on the focus of the project, for example, projects looking to simulate and validate the performance of sensor software for autonomous vehicles will most likely require a highly accurate road environment to allow the sensors to correctly pick up features along the road and validate the results against tests done in the real world. The level of accuracy that is possible is also largely dependent on the sources of data available for the real-world environment. To achieve a very accurate virtual road environment, there needs to be data such as LiDAR point cloud that has been captured from the real-world route that can be used in development.
1e. Time of Day
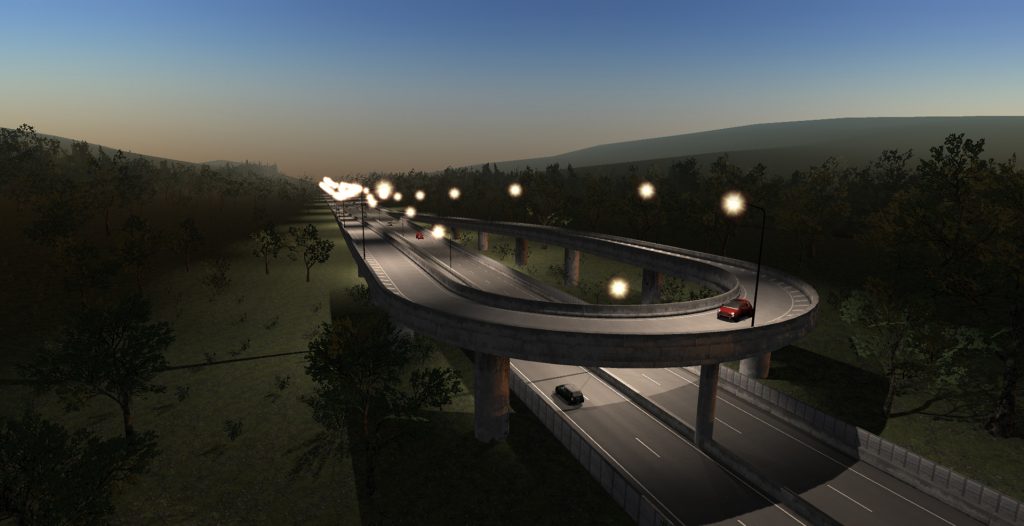
Finally, it needs to be defined whether the virtual 3D road environment will be driven during the day, night or both. If night-time driving is required there will be different or additional elements to consider in the development workflow depending on the capabilities of the target simulation software. For example, simulating night-time conditions may require material properties for surfaces within the environment to be configured to accurately depict the way they respond to light from the car headlamps, streetlights and other lights in the environment. The image below is taken from a project where the client wanted the driving environment to be driven at day and night. Their driving simulator used the Unity games engine which meant we could incorporate some really nice lighting effects for the night-time driving.
2. Defining the Technical Requirements
It has been mentioned a couple of times already that the target driving simulation software can influence how a virtual 3D road environment is developed or what is possible. Therefore, we need to understand what the target simulation software is and any specific technical requirements that may place on the virtual environment. This will enable us to ensure that virtual 3D road environment can be integrated with the simulation software and run efficiently and effectively at runtime.
Such technical requirements can include:
- The file formats for the environment,
- Any naming conventions that need to be adhered to,
- Polygon budgets,
- Performance requirements, for example a frames per second (FPS) target on a specific platform,
- Requirements for a logical road surface model for use by the simulation AI,
- Collision volume requirements,
- Requirements to support interactivity and control, for example to enable traffic lights in the environment to be controlled by the simulator,
- Requirements for a road surface model to be used by the simulation physics engine.
We will also discuss with you the process for testing and accepting the delivered virtual environment. Typically, we write and complete a series of formal tests in-house to ensure that the completed virtual environment meets all the requirements prior to delivery. This is usually followed by you, the client, informally testing the environment in your simulator to gain further confidence that it meets all requirements and that it supports the overall objectives of the project.
3. Acquiring the Necessary Data
Once the content and technical requirements have been defined, our attention turns to the data that is available to help us develop the virtual 3D road environment in the most efficient, cost-effective way. The importance of good quality data cannot be overstated, and it can make a huge difference both in terms of the overall cost of the project as well as the quality and accuracy that can be achieved.
The data requirements will vary depending on the project and its purpose, with geospecific environments generally requiring more, high quality data than geotypical environments due to the need to accurately represent a real-world route.
For a geospecific environment, ideal sources of data would be:
- Existing 3D models
- LiDAR point cloud
- BIM data (2D and/or 3D CAD for example)
- HD maps
- Shape files
- Aerial and on-site photography
- Video footage of the desired route
For a geotypical environment, ideal sources of data would be:
- BIM data (2D and/or 3D CAD of sample road layouts)
- Reference to real-world routes for guidance on general look of desired route
- National guidelines and standards for road design
If you do not already have access to the required data sources, then we will work with you to find and acquire it where possible.
Once all possible data has been acquired, we analyse it and plan our approach for developing the environment.
4. Environment Building
It is at this point that our Content Development team start to work their magic in developing the required virtual 3D road environment using commercially available development tools.
We typically take an agile sprint-based approach to development. This approach breaks development down into a series of time-boxed phases or “sprints”, each sprint having a focussed set of tasks and objectives.
We won’t bore you with the technical nitty gritty of the development process but generally it follows the following stages…
4a. Terrain Surface Modelling
Our team will begin by developing the 3D geometry for the terrain surface that will be running throughout the environment. This will include the road, road markings, kerbs, footpaths and any other terrain surfaces that will be seen when driving in the simulator. The data is constantly used and referred to for obtaining correct measurements and positioning of the terrain surfaces, in particular the road, road edges and road markings.
It is sometimes possible to automate some of the processes depending on the project requirements and the data available. For example, it may be possible to extract kerb lines from LiDAR data and use these to help generate the road geometry.
Textures and materials will also be created for the terrain surfaces. These are applied to the 3D geometry to provide realism and life to the environment. Sometimes aerial photography will be used as textures but where more detail is required on-site photography will take place where possible or textures will be created from scratch.
4b. Feature Modelling
Then we move on to developing the features within the environment which can include buildings, trees, signage, fences, barriers and more. The high-level process for doing this is very similar to that used in developing the terrain surface where the 3D geometry is created for all the features and appropriate textures and materials are created and applied.
The placement of features within the environment is very important for ensuring the virtual environment is as realistic and believable as possible for the driver. Therefore, it is crucial to refer to data sources here where possible to ensure that key, easily recognised features are in their correct locations and that generally nothing looks obviously incorrect which could distract the driver in the simulator.
4c. Physical/Logical Road Surface Modelling
Where the project requires it, we’ll then look to develop the logical road surface model which is what the target simulator will use to drive the AI of other vehicles in the scene. This is typically in a non-visual format specific to the target simulator and includes the details of all driving lanes and important features such as possible paths at crossings, give way points and traffic lights.
If there is a requirement for a separate 3D model to support the simulated car physics, we would also produce this at this point. This is generally an untextured version of the road surface and may also include kerbs, walls, trees, and other objects to inform the car simulator about what is in the scene. Different surfaces may potentially be configured to enable them to have different properties in the simulator, for example a tarmac surface will provide far greater grip than a grassy surface.
As the environment is being developed, regular testing and reviews ensure that the growing environment satisfies all the requirements and will perform as required on the target platform.
We believe in being open and collaborative and encourage your involvement and input during the development process, particularly on longer projects. This mainly comes during scheduled development reviews when in-progress versions of the virtual 3D road environment are made by our development team and shown to you for your feedback and input. This helps our team know that they are on track, helps you keep a finger on the pulse of the project and see progress. It also provides an opportunity to review the requirements, consider any new ideas and accommodate changes in an efficient and effective way.
5. Testing
We carry out internal testing of the virtual 3D road environments throughout development, and we do this at various points during the development process. Typically, we perform testing at the end of each development sprint, as well as just prior to delivery.
Our testing typically involves an independent member of the team writing a series of tests, each one targeted at demonstrating that the released product satisfies a portion of the requirements and meets our own high-quality standards. Testing often involves observing the environment in a runtime environment that will be very similar, if not the same, as you will be using. This aims to ensure that you will get the same results as we do for the final delivered virtual 3D road environment.
We carry out a whole range of tests to make sure that the environment we have developed meets your content and technical requirements and performs smoothly at runtime.
6. Delivery
Once our final round of formal testing has taken place and we are happy that the virtual 3D road environment we have developed meets all the content and technical requirements of client, we will deliver the environment in the desired format.
Delivery of the files can take place by sharing them electronically or they can be handed over or installed by our engineers at a formal acceptance event if desired. You will be able to integrate the delivered environment with your driving simulation software and drive the environment in your simulator. The movie below shows one of our clients, TRL, doing just that…
And there you have it! A high-level overview of the process for developing virtual 3D road environments for driving simulation projects. This is very much a generalised process set out here and every project is different, however we have a wealth of experience in delivering these projects and will guide you the whole way.
This article has been written by Louis Drakes, Business Coordinator at Agility3. For more information, please contact info@agility3.co.uk or call on (+44) 01438 488066.